Insalata Caprese

It’s an addiction. If you’re following on Instagram you have proof of  my total, sold-out, one-track, amore di caprese. I love delicious tomatoes, basil is one of my all time favorite herbs, and then there’s fresh buffalo’s milk mozzarella or better yet, burrata… just TALK TO ME. For as long as I’ve been cooking and eating, there’s been a lot of “insalata caprese” in my life. They began very formulaic and mundane. You know: slice of tomato, with a slice of mozzarella, topped with a basil leaf. And repeat. A little olive oil and balsamic and it’s done. Sadly, I still see these caprese stereotypes everywhere I go. Lacking in imagination and lacking in what could be even better flavor.

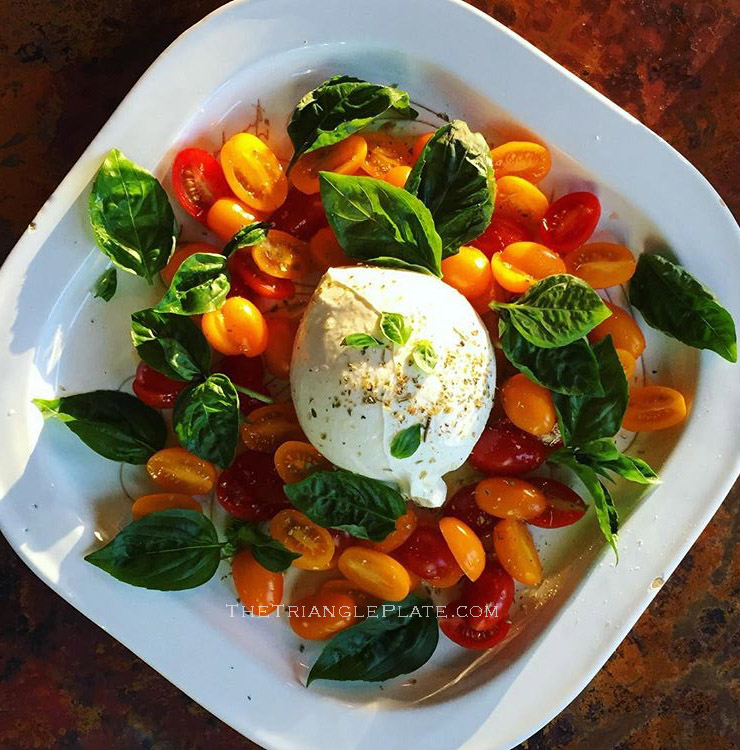
So, I’m sharing an Instagram shot to show you that in this case, breaking the “rules” is just prettier, tastier, and way more fun. There’s something so satisfying when you cut into a fresh round of mozzarella or burrata, so the ol’ slice and stack method is a kill-joy for you and everyone else. I also tend to prefer smaller cherry or grape sized tomatoes which have more flavor than big, round, run-of-the-mill red hothouse tomatoes. Gorgeous heirlooms in season are my exception to this rule — in this case, bigger can be better. And adding a tiny bit of acid with some fresh squeezed lemon juice just plays up all the bright flavors, and balances the heavier flavor of oregano. Yes, that’s right. Dried oregano. Very traditional and very delicious. Cannot be skipped. And finally, aside from a generous drizzle of good extra virgin olive oil, there MUST be good sea salt which creates both crunch and brings out the best in a tomato. Finally, almost never pictured is the aged balsamic vinegar. This, in my opinion, is something each person should add to their own serving of caprese. Adding it before it’s served muddies the presentation and I think it should be drizzled in the amount each person has a taste for.

It’s really that simple. So go out and find the best ingredients you can lay your hands on, and enjoy.

CapreseTrianglePlate

Insalata Caprese

Recipe by Stephanie Kunstle

Note: serves about 4 to 6 if you’re behaving yourself, but to be honest, this will often serve two of us if we make it the main part of our lunch with some rustic bread..and why not?

Fast Fact: The word “caprese” (pronounced ca-pray-say but with flourish) means from Capri. This is simply a salad named for its location of origin, the island of Capri.

Ingredients:

  • a large round of mozzarella di bufala, or burrata
  • good tomatoes, in season, preferably grown in the sun
  • plenty of fresh basil, just picked from the plant if you can get it
  • a large pinch of dried oregano
  • half a lemon
  • good extra virgin olive oil
  • 3-4 good pinches of an extra delicious salt, like maldon or fleur de sel

Preparation:

  1. Place your mozzarella or burrata on a plate or platter. Surround it with tomatoes…sliced or not, it’s up to you. If they are large, do at least chunk them to make serving easier.
  2. Arrange fresh basil leaves however you wish. Sometimes I julienne them and scatter the ribbons all over. Other times I tear the leaves, and scatter. Or I will leave them whole and create a bouquet to pull from as the caprese is served. It’s up to you. It’s your artistic interpretation of caprese.
  3. Gently squeeze the lemon over the arrangement. You don’t want tons of lemon juice, but a gentle drizzle evenly distributed.
  4. Now drizzle generously with a good extra virgin olive oil, hitting the tomatoes, cheese, and basil.
  5. Crush the dried oregano in your palm with your fingers or crush between your fingers as you lightly scatter it over the tomatoes and cheese.
  6. Finally, add your salt to the arrangement, giving an extra heavy hand to the top of the cheese for texture.
  7. Serve with a good bottle of aged balsamic (truly, this stuff can be liquid gold both in price and in flavor…and so worth it).

Posted in summer, autumn, anytime, traditions | Tagged , , , , , , , , | 2 Comments

Petits Gâteaux au Chocolat with Sugared Raspberries

I’ve been making these for nearly 13 years now. This is adapted from an old Martha Stewart recipe; so old, in fact, that you cannot even find it online. Shocking. It’s from a dessert cookbook from the late ’90s that I’ve used so much, the pages are falling out and it has chocolate splatters on it. Very cliché, I know, but that’s a sign of a good cookbook. And as much as one might like to poo-poo Martha, the woman has it dialed in. Her recipes are delicious, and they work. I’m pretty sure her army of staff would die if those criteria weren’t met.

The reason it’s taken me years to post the recipe is merely due to my stubbornness. I like to shoot the food I post in natural light, so late at night after a long dinner with family or friends doesn’t allow for natural light unless you live on the north pole in June. So, I give. And honestly, this is exactly how your cakes will look, in lamp light, because you’ll be eating them after a a fabulous dinner and wow-ing your guests with this show stopping dessert.

What’s nice about this dessert is that there is NO wheat flour in it. I’m all for gluten, but I know that many people are discovering that gluten is of the devil. Martha, who could care less about people’s digestive complications, created this recipe with ground almonds for the flavor, before almond “flour” even existed. Imagine my delight, when it finally dawned on me that I could stop pureeing almonds for the recipe and just grab that sack of almond flour I keep on hand. Felt like cheating, except it’s the same darn thing and a more consistent texture.

Also I should note that Martha named these “Warm Chocolate Cakes.” I wonder if her team stayed up all night trying to work that one out. When they say “no idea is a bad idea” while brain storming, we all know that’s a load of bull. These are too beautiful and too decadent to be called such a name, and so I prefer the Americanized French description of small chocolate cakes with molten ganache centers… “gâteaux” are just trés sexy. And for all the effort (yes, this one requires a bit more than the usual cake), you want a name that lives up to it’s dessert!

PetitsGâteauxauChocolat1

Petits Gâteaux au Chocolat with Sugared Raspberries

recipe adapted from Martha Stewart’s Desserts cookbook (1998): “Warm Chocolate Cakes”

Note: You will need 8, 4-5 oz. ramekins for this recipe. I suggest making the ganache cubes a day or two before you make the cakes. One less step to rush later and it only takes 5-10 minutes to do. In fact, this recipe can be prepped several days in advance: all you need to do is bake the frozen cakes before serving them and just have your raspberries, mint and cream ready.

Ingredients:

  • 14 oz. best-quality bittersweet chocolate (I shoot for around 65% or on up to 72%)
  • 6 Tbsp. heavy cream
  • 6 Tbsp. unsalted butter
  • 5 large eggs, separated
  • 10 Tbsp. sugar (I use baker’s sugar…finer than regular sugar)
  • 1/2 tsp. pure vanilla extract
  • 3/4 c ground almonds (hello, almond flour)
  • confectioner’s sugar (powdered sugar) for dusting
  • pint of raspberries
  • 1/3 c or so of white granulated sugar
  • 1 egg white
  • 2 cups heavy cream, whipped
  • mint sprigs for garnish

Preparation:

  1. Chop 2 ounces of chocolate into small pieces and place in a small bowl. Pour the cream into a small saucepan, and set over medium heat. Cook until bubbles appear around the edges. Pour the hot cream over the chocolate, and let stand 2-3 minutes; then whisk until smooth. Pour the ganache to fill (or almost fill) 8 squares of a plastic ice-cube tray. Freeze until solid.
  2. Butter 8 ramekins (that hold 4-5 oz) and place the ramekins on a baking sheet. Set aside.
  3. Melt the butter and the remaining 12 ounces of chocolate in a heat-proof bowl or the top of a double boiler over a pan of simmering water. Stir until smooth. Remove from heat, and let cool slightly.
  4. Combine the egg yolks, 6 Tbsp. sugar, and the vanilla in the bowl of an electric mixer. Beat until thick and pale yellow, about 8 minutes. Add the warm chocolate-butter mixture, and combine thoroughly. Fold in the ground almonds. Transfer mixture to a large bowl.
  5. In a clean mixer bowl (that you just washed), beat the remaining 4 Tbsp. sugar with the egg whites until stiff…VERY stiff. Just turn that mixer on and go check your email for a few minutes because you want these egg whites as stiff as they will be. Then, with a rubber spatula, fold the egg whites into the chocolate mixture.
  6. Spoon about 2 Tbsp. of batter into each ramekin. Remove the ganache cubes from the freezer (dip the bottom of the tray in hot water to release them, if necessary). Place a ganache cube in the center of each ramekin. Spoon 2-3 Tbsp. of remaining batter into the rings, covering the ganache cubes completely, using all the batter. Smooth the tops of each cake with a small knife. Freeze filled ramekins until solid, about an hour or so.
  7. Meanwhile, cover a large baking sheet with parchment paper. Beat the egg white with a fork in a small bowl or wide mouth cup. Using a pastry brush, dip the brush into the egg white and “paint” the outside of a raspberry, then immediately sprinkle all over with the white sugar. I inserted the end of a rounded tea spoon (a real tea spoon, used for tea or coffee, not the one you eat your cereal with…a tiny spoon) into the raspberry so it was on a sort of pole which made the painting and sprinkling easier because my fingers weren’t in the way. See what you have lying around that might work for a little raspberry stand. After you have painted and sprinkled, gently set the berry on the parchment paper. Repeat this with as many raspberries as you’d like to garnish your cakes with… I think 3 looks nice on each cake. After you have sugared your berries, you’ll need a cool place for them to set for an hour or two. The refrigerator works, if you have room, or just a cooler place (not near your hot oven) in the house.
  8. Heat oven to 375ºF. Remove the baking sheet from the freezer and transfer to the oven. Bake cakes until they have puffed slightly over the tops of the ramekins, 20 to 25 minutes (I bake for 25 at high altitude). Transfer baking sheet to a wire rack; let cool for 5 to 10 minutes.
  9. While cakes are baking, whip your cream so it’s soft and but not so soft it runs easily. Have your mint sprigs ready to go!
  10. Once cakes have cooled slightly, garnish with a dusting of confectioner’s sugar, a dollop (or quenelle) of whipped cream, a sprig of mint, and a few sugared raspberries and serve.

Posted in anytime | Tagged , , , , , , , | 5 Comments

Double Chocolate Waffles

For the most part, I’m a purist, except in the case of thick strips of bacon on top of my hamburger with blue cheese. I otherwise believe in choosing a theme and sticking with it. At least, this is all I can come up with to explain why I never cared for “chocolate chip waffles” that get the little people in my house all jumpy and breathless on Saturday and Sunday mornings. Even Dave, if given the option, goes for the chocolate chips when they are offered. I tried to like chocolate chip waffles, I did try. But the chips felt like interruptions to my waffle happiness. So when the request came up on a lazy weekend morning last week, it suddenly occurred to me that IF the whole waffle was chocolate, then little melted dark chocolate chips scattered inside would make total sense. Go big or go home, right? And do it without a sugar coma, I say. I still think sugar should not be the flavor of anything, and in most cases should be decreased or left out completely. A sprinkling of chocolate and a drizzle of maple syrup, and you’re happy. And so the double chocolate waffle was born — delicious, floats all chocolate-lovers’ boats, and you can walk away from the breakfast table without needing to detox.

DoubleChocolateWaffles

Double Chocolate Waffles

recipe by Stephanie Kunstle, adapted from my mom’s regular waffle recipe

Note: makes 14-16 waffles in a 4-grid Belgian waffle maker… Easily serves 6. I like to serve these with freshly whipped cream, more chocolate and some maple syrup, but berries would be delicious too.

Ingredients:

  • 1 and 1/4 c unbleached flour
  • 1/2 c whole wheat flour
  • 1/2 c cocoa powder
  • 1 Tbsp. flax meal
  • 1 and 1/2 tsp. baking powder
  • 1/2 tsp. baking soda
  • 1/2 tsp. salt
  • 2 and 1/2 c buttermilk
  • 2 eggs
  • 1/2 c extra virgin olive oil
  • 1 c chocolate chips (I used 72% cacao, but choose what you like)

Preparation:

  1. Preheat waffle maker to desired heat for desired crispness (on a scale of 1 to 10… I head to 5).
  2. In a medium mixing bowl, combine all dry ingredients and whisk together.
  3. Add the buttermilk, eggs and olive oil and whisk together very well, making sure there are no lumps.
  4. Fold in the chocolate chips with a rubber spatula until incorporated.
  5. Let the batter rest for 5 to 10 minutes, which allows the rising agents to do their thing.
  6. Ladle batter into your hot waffle maker, and cook according to manufacturer’s instructions.
  7. Top with freshly whipped cream, more chocolate chips and pure maple syrup (or throw some raspberries on top, skip the maple syrup and go for a dusting of powdered sugar… the world is your oyster…or…er…waffle).

Posted in spring, summer, winter, anytime | Tagged , , , , , , , , | 7 Comments